Dashboard
The Dashboard contains the most common tasks, recently opened repositories and categories (favourites). Categories can be added, grouped in the repository context menu.

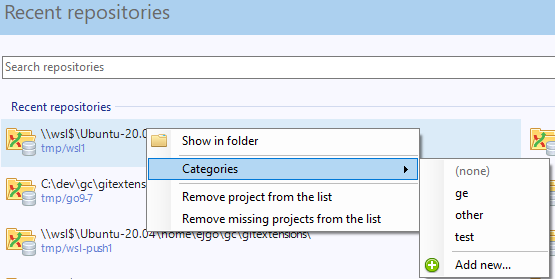
Recent Repositories can be moved to favourites using the repository context menu. Choose Categories / Add new to create a new category
and add the repository to it, or you can add the repository to an existing category (e.g. ‘Currents’ as shown below).
To open an existing repository, simply click the link to the repository, or select Open repository (from where you can select a repository to open from your local file system).
To create a new repository, one of the following options under Common Actions can be selected.
Create new repository
When you do not want to work on an existing project, you can create your own repository using this option.

Select a directory where the repository is to be created. You can choose to create a Personal repository or a Central repository.
A personal repository looks the same as a normal working directory but has a directory named .git at the root level
containing the version history. This is the most common repository.
Central repositories only contain the version history. Because a central repository has no working directory you cannot checkout a revision in a central repository. It is also impossible to merge or pull changes in a central repository. This repository type can be used as a public repository where developers can push changes to or pull changes from.
Open repository
Opens a Git repo already existing on the file system.

Clone repository
You can clone an existing repository using this option.

The repository you want to clone could be on a network share or could be a repository that is accessed through an internet or intranet connection. Depending on the protocol (http or ssh) you might need to load a SSH key into PuTTY. You also need to specify where the cloned repository will be created and the initial branch that is checked out. If the cloned repository contains submodules, then these can be initialized using their default settings if required.
There are two different types of repositories you can create when making a clone. A personal repository contains the complete history and also contains a working copy of the source tree. A central (bare) repository is used as a public repository where developers push the changes they want to share with others to. A central repository contains the complete history but does not have a working directory like personal repositories.
Clone Github repository
See GitHub.
Organizing your repositories with categories
Over time, the list of repositories you deal with can grow long. As it does, it can become difficult to find a repository you are looking for in the “Recent repositories” list when you have opened many other repositories since you opened the one you are looking for. To help find repositories quickly, you can group your repositories into categories that will display in alphabetical order on the Dashboard.
Create new category
While the Dashboard is being displayed (after application start-up), you create a new repository category by doing the following:
right click the repository you want to group into a category,
select “Categories”,
select “Add new…” from the resulting submenu,
type the name of the new category,
click the [OK] button.
The originally-right-clicked repository will now additionally appear in your new category (repository group), where you can quickly find it again later no matter where it appears in the “Recent repositories” list.
Rename a category
If you later decide you want a category to have a different name:
click the “Actions” menu to the right of that category,
select “Rename category”,
edit the current name to the new name you want,
click the [OK] button.
Your category will now show its new name, and be sorted among the other categories accordingly.
Delete a category
When you no longer need a category:
click the “Actions” menu to the right of that category,
select “Delete category”,
read the warning displayed (deleting a category cannot be undone),
click the [Yes] button to delete it, or [No] to preserve it.
If you clicked [Yes], the selected category will no longer be displayed on the Dashboard.